Having a defined walkway/path in your garden or backyard is quite convenient.
It’s not only much more pleasant to walk on the stone/concrete surface bun not on slippery wet grass or land after the rainfall.
In addition to that, walkways are used to prevent lawn damage caused by heavy traffic and add a little decorative touch to your backyard landscape.
The type of walkway and, consequently, material it’s built of, depends on what you’re going to use it for.
For instance, concrete walkways are perfect for people who have little children, as they’ll be able to ride their little bicycles and draw with chalk on it.
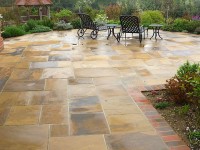
Stone paths are a little bit more decorative and may vary in their designs.
Different mosaic, paver or milled shapes of the stones, outlines of the actual path, size of gaps between individual stones, their color and pattern allow masonry contractors and dedicated DIYers experiment with designs, color and pattern combinations, base materials, etc.
Today we’re going to experiment with flagstone, as we’re about to learn how to lay a flagstone path in your garden or yard.
Why flagstone?
Flagstone is the kind of paving material that is known for its durability, variety of shades, designing multifunctionality, versatility and low maintenance.
That’s why this stone became one of the most popular choices of masonry contractors when it comes to installing walkways, garden stepping stones and patios.
Moreover, the flagstone path looks quite natural, like it’s meant to be in your garden. Almost like the nature, but not human, created it
The process of flagstone path laying is not quite difficult. Almost everyone doesn’t mind a certain dose of physical labor and getting his hands a little bit dirty will be able to cope with it.
Just follow the instructions below and you’ll build a stone path in your own yard in a day or even less.
However, you may always call for the professional masonry contractor’s assistance if you experience any difficulties along the way.
Just go to HireRush.com and post a flagstone path building request to get reached out by local pros ready to start laying your path.
The final path will look amazing and will serve you for a long time due to the quality of contractor’s work for sure.
How to lay a flagstone path (step-by-step guide)
- Collect your tools and materials. You’ll need a shovel, a rake, a rubber mallet and a water hose/builders string. You may also need a pair of loppers or a small ax.
When it comes to materials, you’ll have to buy the flagstone, of course, as well as the crushed stone, landscaping fabric, 3-4 wood boards cut according to the width of your path, walkway edging and flat steel spikes. - The amount of materials is directly related to the dimensions of your future path. So, you’ll have to conduct all necessary calculations on your own.
- Determine the outline of your path using your water hose or builders string. Add some curves to your path’s shape to make it a little bit more intricate and natural-looking.
- Take your shovel and work it into the ground along the outlines of the walkway to create marking lines. Those will be the path’s borders.
- Start digging inside these outlines. You’ll have to dig about 4 inches into the ground to form the path’s base hole.
- You may bump into the trees’ or bushes’ roots while digging. Your shovel will be able to cut most of them. Use your old loppers to cut out thicker ones.
Don’t touch too thick vital roots, as if you cut them, you may cause significant or even fatal damage to the tree.
Those roots won’t ruin your final path.
But if they bother you too much, just change the outline and add another curve to your path. - When the base hole is done, use a hammer and spikes to install the edging on both sides of the path. This protective border will prevent crushed stone from crawling out of the path and scattering all over your yard.
- Make two cuts in your wood planks and secure them onto the edging at different ‘check spots’ of the path.
The distance between them should correspond to the width of your path. This way they’ll help you keep the path’s width even. - Use your shovel to smooth out the bottom of the hole.
- Cover the latter with landscaping fabric to prevent the trees’ roots from growing into the path’s base.
- Fill the base with crushed stone. Spread it all over the base using a rake.
- Bring your flagstones closer to the spot and start installing them according to chosen pattern.
- You don’t need to use concrete solution to do that. Just place one flagstone onto the base and work it into the crushed stone using a rubber mallet.
You may even jump on it if you want to.
Watch similar tutorials on YouTube if you’re a little bit confused. - Repeat step №13 as many times as you need to finish the path.
- Don’t forget to conduct a celebratory path jumping once you’re done! You did a great job! Hi five!