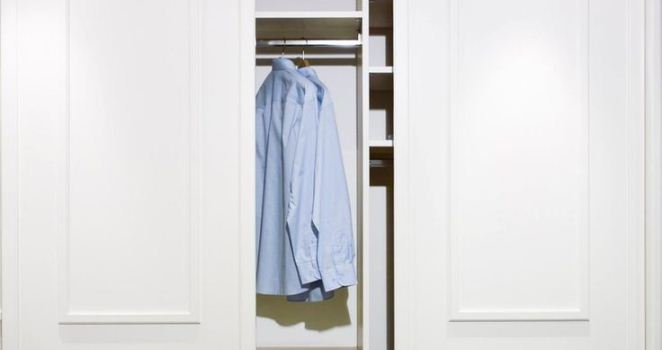
The lack of the storage space is familiar for everyone who has to deal with living in a smaller space or in an old house that didn’t have too much closet room. And, sometimes the bedrooms of an ordinary house may not include closets or they may be too small for you to fit in all the clothes you have. So, whether you’re willing to incorporate a new closet into an existing room, reposition your current one due to the remodeling, add an extra closet to your refinished basement or expand the hallway storage, you’ll need to figure out how to build a closet and how to position the shelves and racks to make the full use of the closet space.
Usually, people don’t personally deal with the closet construction. It seems much easier to hire an indoor contractor (a handyman or a furniture assembly specialist) and let him recreate one of the closet designs at your house. Getting your closet built by a professional will definitely save your time, effort and even materials if you’re not quite an experienced DIYer. Check out HireRush.com and scroll though the handymen’s profiles to call the one who’s familiar with performing closet building and provides his services at the best price. Or, you may post a closet building task instead. Describe the details of the future construction, so that the providers find your ad and call you to get the job.
However, building a closet is one of the easiest indoor construction tasks to perform. Basically, you’ll need to install the wooden framing, add the drywall or other panels to make the walls, get the doors, install them, add the shelves and the racks (you may make them yourself too), paint the closet’s outside if you need to and proceed to transferring your clothes into their new home. If you plan the closet construction thoroughly, come up with the design and calculate all the dimensions, you may get all materials (wooden posts, panels, drywall sheets, runners, etc.) cut according to your measurements right at the store in order to save on time and instruments’ costs. Some stores even offer small closet kits (like a piece of the flat-pack furniture), which include all necessary details to build a closet of a certain type and design.
So, if you’re not willing to hire a professional, but still need more space to organize your clothes, use this step-by-step guide to build a new closet in the easiest way possible.
Steps to build a closet (really simple)
First of all, let’s determine the easiest way to build a closet. Naturally, the good old ‘wooden frames and drywall’ method comes to mind. However, this method involves too much framing assembly action, which, in fact, is quite unnecessary and may be easily skipped. In addition to that, these traditional closets feature either normal or bi-fold doors, which may be really annoying and not quite modern-looking. On the other hand, this method is the one you’d prefer if you needed to build a large spacious closet (like a wall-to-wall one or just really long one). But if you need to incorporate a small or a mid-sized closet into your room, you may totally build it out of wooden panels and avoid the framing construction. And, positioning the closet in the corner of the room will make the job even easier. That’s why I decided to show you how to build a corner wood-panel closet with sliding doors. I believe that this is the project almost everyone may finish without the professional’s assistance and at a minimum time.
- Plan the location of your closet, measure how wide and how long you want it to be. Don’t forget to measure the exact height of the room. Draw a simple plan with all the dimensions and head out to the store to grab the materials and hardware. You’ll need a side wall wooden panel with treated edges, sliding doors (if you don’t want to make them on your own) and a sliding door mechanism with runners of the length of your future closet. Besides, you’ll need to get one narrow panel plank to hide the ceiling sliders and secure the doors at the top and a jamb to attach your closet to the actual wall opposite to its wooden side.

- Don’t forget about the hardware and screws. If you want to build the sliding doors on your own, you may purchase finished poplar wood to match the side panel, a sliding door kit and a sheet of the corrugated plastic. As for the tools, you’ll need a level, a drill, a hand saw, a screwdriver and a carpenter’s square. Get a kreg jig if you’re going to make the doors according to this guide. And, if you plan on installing your own doors, it’s better to purchase the unfinished wood panel to be able to paint the side wall and the doors in the same color. Obviously, you’ll need the paint and wood finish too.
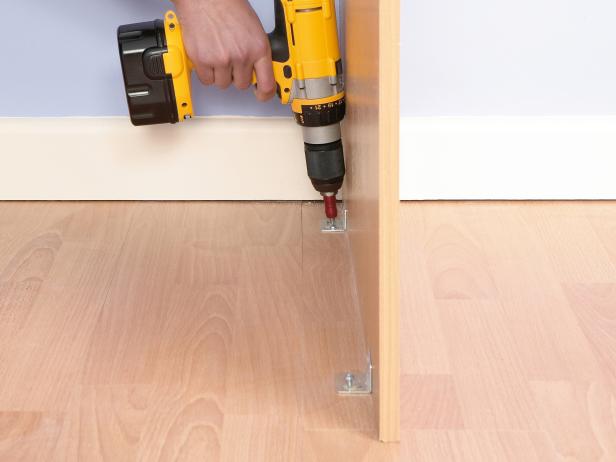
- Paint the side wall in advance. Measure from the corner of the room to the point where you want the closet’s side wall to be. This will be the length of your closet too. Draw a plumb line on the wall. Ask someone to hold the side panel in place and take a carpenter’s square to check heck with a square that the angle between wall and panel is 90 degrees. Adjust the panel and use metal plates and screws to attach it to the floor. Do the same at the ceiling.
- Grab a level to check if the closet’s side wall is plumb. If it’s not, use the slots in metal plates to make it stand straight. At the other “side” of the closet, draw a guide line on the wall for the closet’s front edge. The jamb will sit against this line.
- To make the jamb sit in place, measure its width and cut the according openings in the baseboard and ceiling borders using a hand saw. Measure everything accurately to make sure that you make perfectly parallel openings. Get the jamb and use the screws to attach it to the wall. Check your work with a level.

- Measure the distance between the side wall of the closet and its jamb at the top and bottom openings to see if it’s ‘square’. Make sure that the rails of the sliding mechanisms fit inside those openings. A hacksaw will make them shorter if you need. Follow the manufacturer’s instructions on positioning to attach the top rail to the joists in the ceiling. Use the plugged hardware required for the ceiling type.
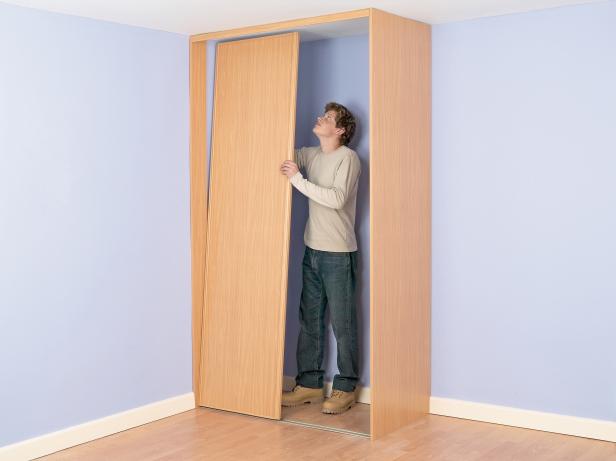
- Take the base rail and place it between the side panel and jamb. Hang the doors on the runner mechanism. (If you decide to make your own doors, make them beforehand according to the instruction below). Adjust the doors until they run smoothly and secure the bottom runner. Make sure that you don’t damage the wires under the floor. Use the detector to find them before driving any screws in.
- Purchase closet storage units and racks and set them up in your brand-new closet. Check out the post on HGTV.com to find the most effective closet storage ideas.
How to make sliding doors for your closet
- Get the wood for the doors cut at the store according to your measurements.
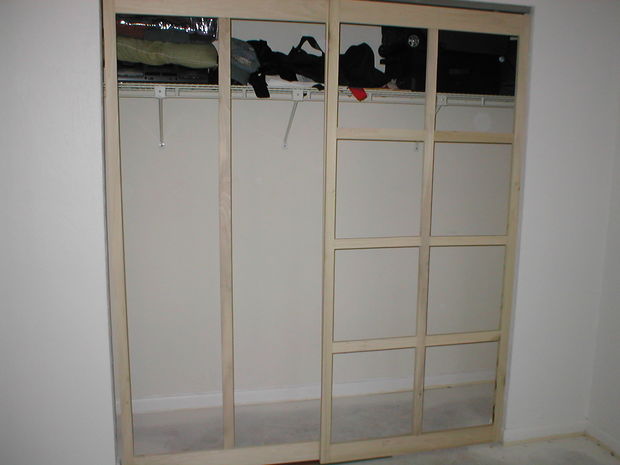
- Make the rectangular frame for the doors. Use the Kreg jig kit to make the openings for the screws at the top and the bottom of the frame’s sides. Check in with the kit’s the instructions if you find making them quite difficult.
- Measure and mark your holes and mount the rail. Attach two sliding door hangers to the top and bottom parts frames. Measure a set distance on each end of the door frame to make sure that the 2 hangers are spaced evenly.
- Secure the middle framing pieces. Get creative and choose any pattern you want. Drill your jig holes into the middle pieces and attach them to the frame. Added the middle divider first to attach shorter pieces to it later.
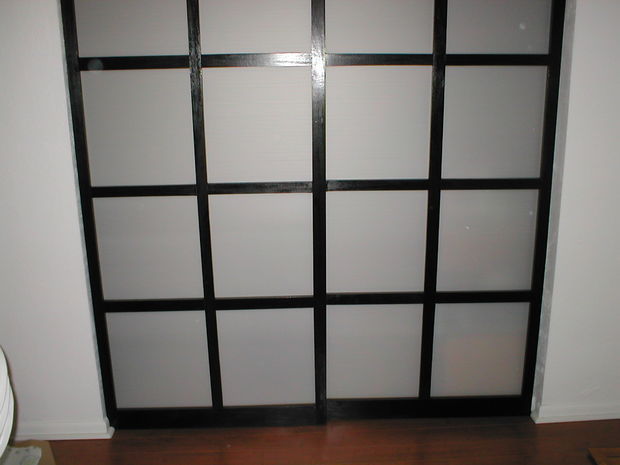
- When that’s done, lean the top of the sliding-door panel toward you and lift it off the bottom track to dismantle each door. Stain or paint them. Add the gloss finish if you want. Once the doors are completely dry, attach the corrugated plastic backing to the back of each door with the screws. Reinstall the doors and enjoy the look.