Previously in Part 1…
In the first part of the article, we’ve talked about different loft building and planning options, as well as risks that might be involved in the project. We’ve determined which tools and supplies you’re going to need to be able to carry out this DIY and the measurements you need to take prior to heading out to the store to purchase those supplies.
We’ve determined which tools and supplies you’re going to need to be able to carry out this DIY and the measurements you need to take prior to heading out to the store to purchase those supplies.
We’ve also learned how versatile this basic loft building plan can be and how you can customize it according to your needs and desires.
So, make sure to click here and check it out before proceeding to the actual loft building instructions given below.
For this kind of plan you’ll need:
- 6 of 56” long 4×4’s (for the frame and horizontal beams)
- 4 of 5ft long 4×4’s (vertical posts and ladder side)
- 2 of 7ft 4in long 4×4’s for the frame’s inside (adjust number to your wall-to-wall space),
- a sheet of 62” wide and 8ft long 3/4″ plywood (adjust the length to your wall-to-wall space)
- 6 of 22’’ long 2×4’s and 2 6ft long 2×6’s (for the ladder)
- about 55 angle joint brackets
- 10-ish flat joint brackets
- a bunch of deck and lag screws.
If you’d like to add a side railing, you’ll have to purchase 6 of 22’’ long 1×2’s and one 5 or 8ft long 1×2.
However, you may make that railing as long as you want and, of course, adjust it to the length of available wall-to-wall space.
Assemble the loft
You may cut the beams and posts to meet the dimensions at home, or you can ask the shop guys to do that for you. The last option will be a lot easier.
- When the beams and post are ready, the first thing you need to do is to secure the 5ft long vertical posts to the opposite walls using as many lag screws as you think are needed.
Place the ‘corner’ post 4’’ away from the main 8ft long wall. Attach the next post at the 48’’ distance from the corner one. - Make sure to secure the top and the bottom ends of the posts with two screws, and attach them the wall from 2 to 4 times to between the top and bottom points.
Always use two screws for one connection. - Connect the posts with 56’’ long horizontal beam at the 2ft 6in point. Use angle brackets and deck screws to attach it to the vertical posts, and lag screws to secure it to the wall.
- Assemble the frame of the actual loft. For that matter, build the outer rectangle by securing two 8ft long 4×4’s and two 56’’long 4×4’s together using lag screws and angle brackets for sturdier structure.
Before that, make 2×4 notches in each of those four beams.
After that, attach 3 of 7ft 4in long 4×4’s to the loft frame’s inside (at the 16’’ distance) with the help of lag screws and angle brackets. - You may make notches in the frame and inside beams to make the connection even stronger.
- Cover the frame’s top with plywood (secure the sheet to the frame using deck screws).
- Ask your strong buddies to help you lift the loft frame onto the vertical posts and attach it to them using lag screws, angle and flat brackets. Make sure to secure the frame’s sides to the walls as well.
- Build the ladder. Attach 2×4’s to the ladder’s sides using deck screws to build its steps.
- Secure the ladder to the loft either at its front or cut out a square hole in the plywood sheet in between the two long framing beams, attach a small 2×4 or 4×4 underneath that part of plywood to finish the square’s frame and install your ladder there.
- Build the railing using 1×2’s and deck screws. Attach it to the outer side of the loft’s frame.
Finishing touches
Test the loft and connections between the posts and beams.
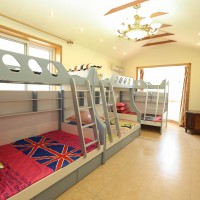
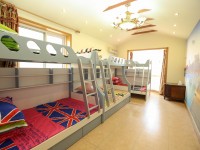
Paint or stain the loft, let it dry, lift up the mattress and decorate the loft according to your preferences.
Arrange the space underneath your loft. You may place the bookshelves, a desk, a dresser or even a couch there.
Some people, who live in small apartments, even manage to fit the entire kitchen under their lofts, arrange a mini-office or lounging area under there.