Some day you may see fit to set up a new outlet in your home. The task is not so difficult, but requires some knowledge and procedure understanding.
There and then, dealing with electric light is always a slippery slope. That’s why you need additional information to make everything right.
For the ease of convenience, new socket installation is a great option. No more extending cords snaking on the floor, access to appliances etc.
Such cords by the way, can be really dangerous for little children and represent a serious fire hazard. So stop it and make a new plug from scratch.
Installing receptacles is not as complicated as you might think. It’s a moderate project that can be completed in a day.
Just follow our instructions and be doubly careful with all those wires and electric current. It’s is not recommended to start the job for people, who are dense about electricity.
If that’s the case, you should better commit a task to a specialist. Get in the HireRush.com and find a suitable pro leaving an application under.Leave your request here
For the proper do-it-yourself electric outlet installation, read on the article. It will help you to know some details and give you some handy tips that can be useful in process.
Step-by-step guide on receptacle installation
-
Turn off the circuit breaker
In order to work safely you have to fully take all precautionary measures. Minimize all chances to receive an electric shock or any other risks before starting.
Turn the power off first. Make sure there is no electricity in the room where you’re going to set up a socket.
After you saw the breaker off on the power panel, go to the plug and check the current with the help of voltage tester. -
Make a hole
When you defined a location for the new receptacle, mark it with a pencil. Then, start making a square cut in the drywall.
You can apply a jab saw, but it’s considered too tough. Electricians usually recommend using a screwdriver, as it less damages the wall.It’s important to do it precisely following the lines you’ve marked. The size plays great role and you better do the smaller starter hole.
In such a way you will be able to extend the hole using utility knife. But if you cut too small, it may happen inapplicable. -
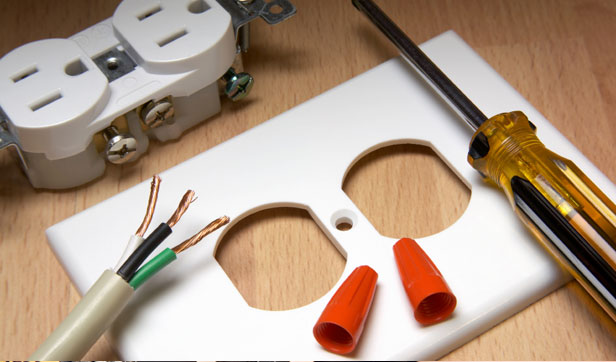
Strip wires
Now, you need to remove the outer sheathing from the cables. It’s better do to it prior to the box installation.
There are some alternative ways to strip the wires. One of them is using a razor knife.
But be careful; don’t shear off deep, as the wire may be damaged. Cut at around 6 inches from the end.
Otherwise, make use of wire stripper cutting the wire edges. -
Establish connection
The next step is about making all kinds of connection in the new outlet. First goes the copper wire.
This is a ground connection. The rule is that before you make a connection, spin the green wire so that it is semicircular.
In addition, make sure the open part of the wire is attached to the right side of the outlet. That will prevent the wire from separating from the screw while drawing up tight.
Next is neutral connection. Find the white (neutral) wire and fix it to the outlet’s silver screw.There are different sockets and they work on different principles. One of them is connecting the wire to the outlet’s side slots.
If you have that kind of plug, just tighten the screws here. Otherwise, repeat the same actions as to the copper wire.
The final step is to connect the black wire. It represents hot connection. Find a small slot on your outlet.
Nothing new for you, most probably you will have to wind the wire over the brass screw. Make sure the copper wire is far enough from other wires to prevent a short circuit. -
Affix the outlet
It’s time to fix the outlet in to the box. But at first, you should consider some of these tips.
Don’t let the wires cramming because of the risk of the fire. Make sure the wires have a room and enter the box without tight bends.
One more thing is that it’s better to install the receptacle with the copper wire on top. This is important safety measures that can safe one’s life. -
Screw the outlet plate
This is a final phase of your job and actually the easiest one. Secure the covering socket plate to the wall with the screws.
Position the plate evenly to ensure the nice outlook. When screwing a plate don’t overdo it, as the plastic may give under. -
Turn the power on
When the project is fully completed, you can switch on the electricity back again. But do it just at the right time after you finished all steps.
Take a tester and check the circuit. If you’ve done everything in the right way, you will have about 120 volt from the hot to both ground and neutral connection.