How to Fix a Leaking Sink and Drain Problems
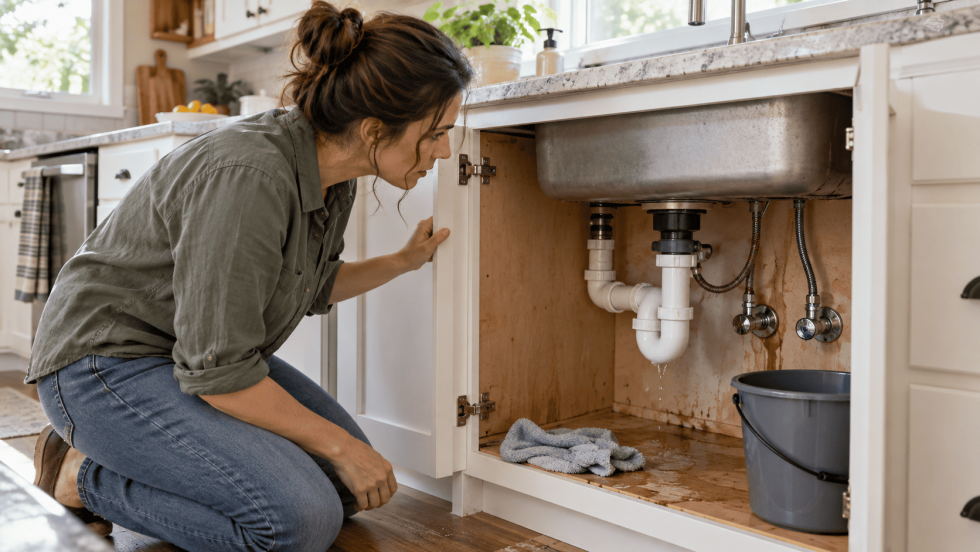
You reach under the kitchen sink for a trash bag and your hand lands on a damp cabinet floor. Maybe there’s a water stain, a musty smell, or a slow drip you never noticed. A leaking sink is one of the most common plumbing problems in any home, and it’s usually easier to fix than it looks.
Most leaks come from a few predictable spots: loose drain connections, worn washers, aging supply lines, or a failed seal around the drain. Below are a five-minute test to find the exact source, step-by-step fixes for supply-line and drain leaks, and the warning signs that mean it’s time to call a plumber.
Why Is Your Sink Leaking Underneath?
Quick answer: A sink leaking underneath is usually caused by a loose slip nut on the P-trap, a worn washer, a failing water supply line, or a broken seal around the drain basket. Dry the cabinet, run water in stages to find the source, then tighten or replace the faulty part. Leaks inside the wall need a plumber.
Small leaks add up fast. According to the EPA’s Fix a Leak Week program, household leaks waste more than 9,300 gallons of water a year in the average home. Under a sink, the bigger cost is often the damage: swollen cabinet floors, rotting subfloor, and mold.
Use this table to narrow down the cause based on where you see water.
| Where you see water | Likely cause | DIY fix | Call a pro if… |
|---|---|---|---|
| Curved P-trap or its nuts | Loose slip nut or worn washer | Tighten the nut, replace the washer | The trap is cracked metal or keeps leaking |
| Under the drain basket | Dried-out plumber’s putty or gasket | Remove and reseal the strainer | The sink flange is cracked or corroded |
| Shutoff valve or supply hose | Loose compression nut or aging supply line | Tighten 1/4 turn or replace the line | The valve won’t close or is badly corroded |
| Faucet base, only when water runs | Worn O-rings or loose sprayer hose | Replace O-rings or reconnect the hose | The faucet body is cracked |
| Dishwasher or disposal connections | Loose hose clamp or failed disposal seal | Tighten the clamp, reseat the hose | Water drips from the bottom of the disposal |
| Back wall where the drain enters | Loose trap arm nut or pipe leak inside the wall | Tighten the trap arm nut | Water keeps coming from inside the wall |
How to Find a Leak Under Sink Cabinets in 5 Minutes
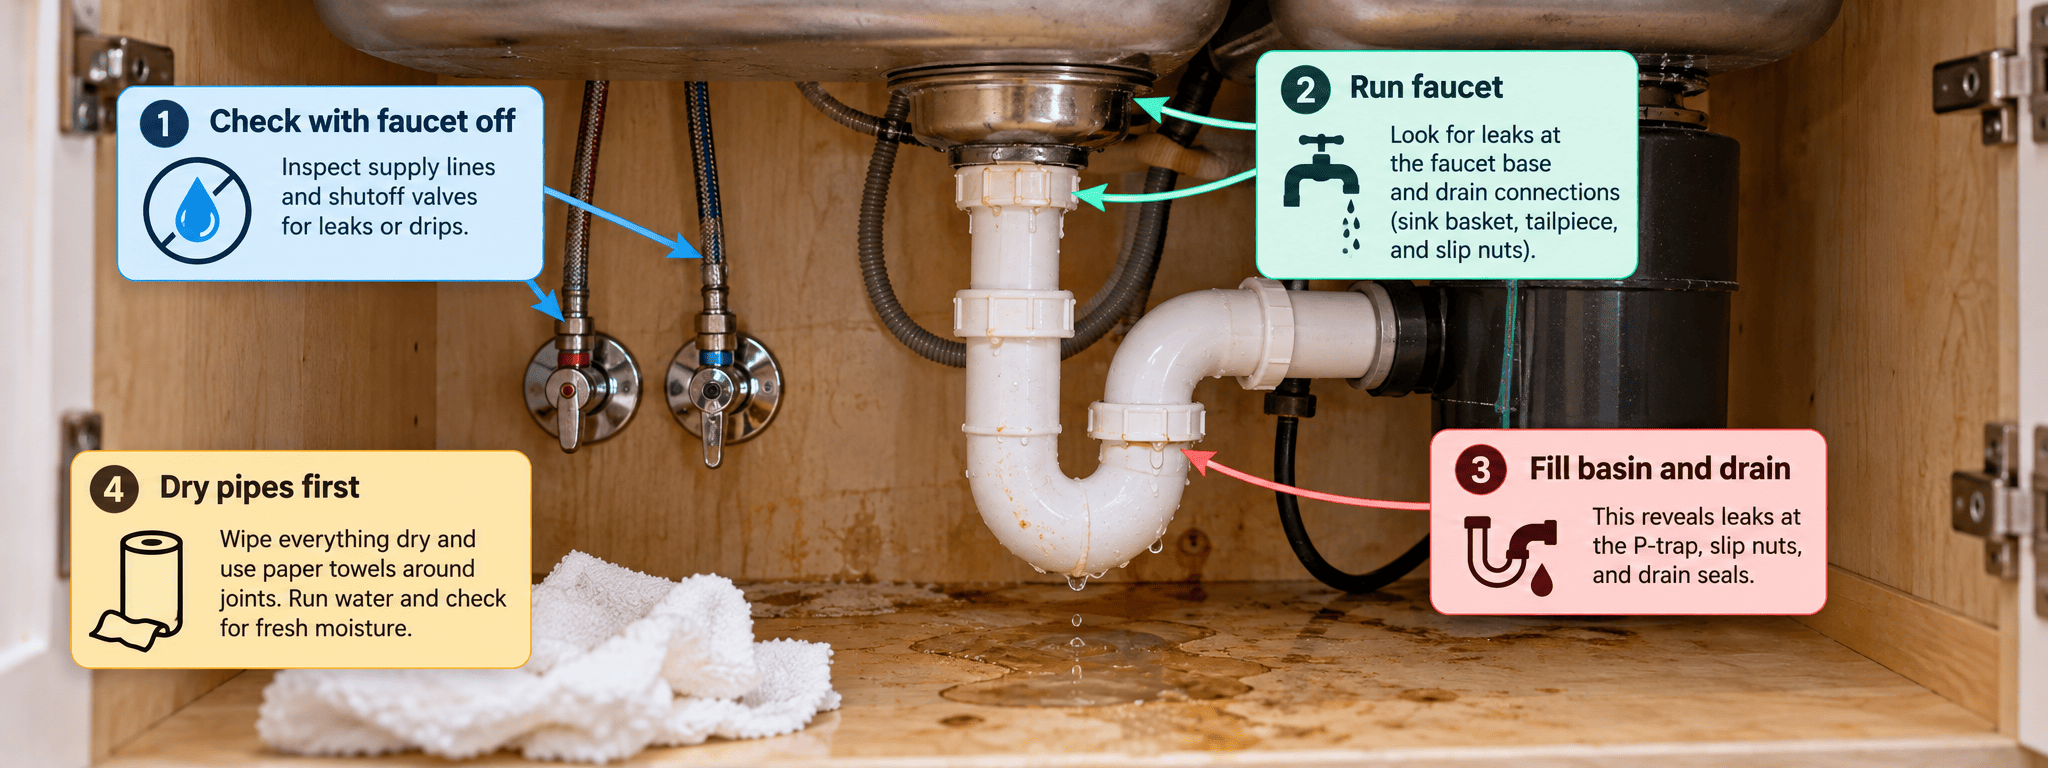
Water travels along pipes before it drips, so the wet spot is often inches away from the real source. This quick test pinpoints it.
- Empty and dry the cabinet. Remove everything and wipe every pipe and the cabinet floor with a dry towel.
- Add paper towels. Lay a sheet flat on the cabinet floor and wrap a strip around each joint and connection.
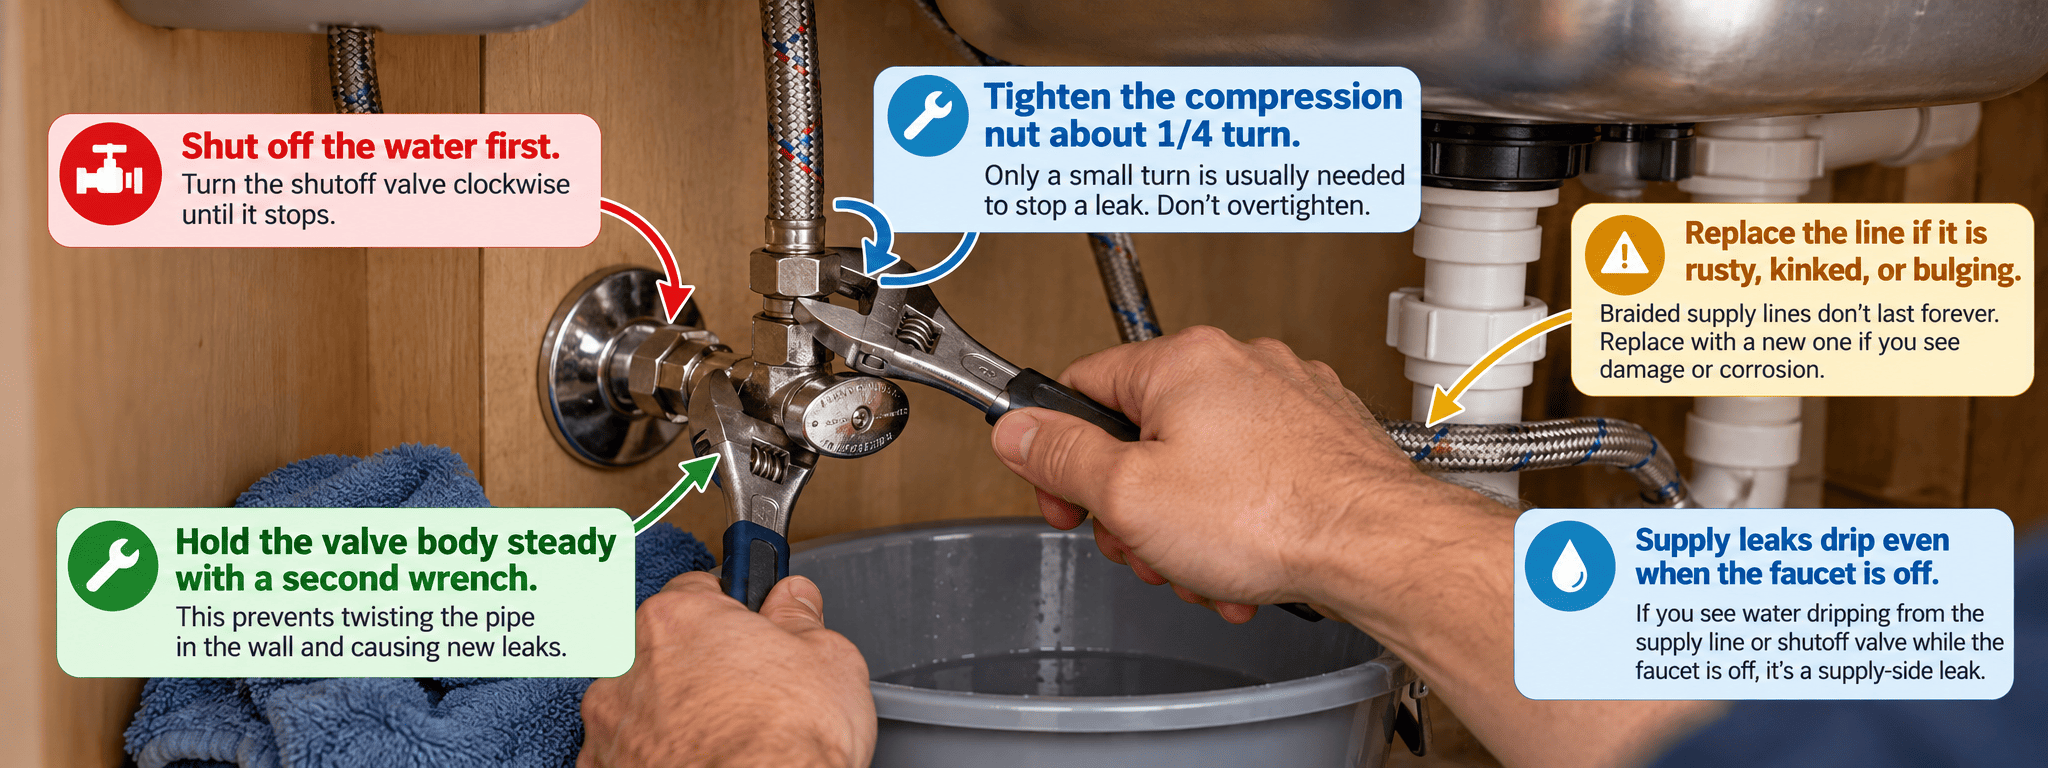
- Check the supply side first. With the faucet off, look at the shutoff valves and supply lines. These are under constant pressure, so a leak here drips even when nobody uses the sink.
- Run the faucet for one minute. Keep the drain open. Wet towels near the faucet base or sprayer hose point to the faucet. Wet towels lower down point to the drain.
- Fill the basin, then drain it. Fill the sink 3–4 inches deep and pull the stopper. A full sink puts the drain under load and reveals leaks that a trickle won’t.
Pro tip: Use a flashlight and run a dry finger along the underside of each pipe. Drops collect at the lowest point, so trace the moisture upward until your finger stays dry.
How to Fix a Leak Under Kitchen Sink Supply Lines and Valves
Fix supply leaks first, because those lines stay under pressure around the clock. Tightening a nut or swapping a supply line is usually a short job with two wrenches.
Tools & materials
- Two adjustable wrenches
- Bucket and old towels
- Flashlight or headlamp
- Braided stainless steel supply line (if replacing)
- Rubber gloves
Step 1: Shut off the water
Turn the shutoff valve under the sink clockwise until it stops. Then open the faucet to release any pressure left in the line. If the valve won’t turn or keeps dripping, shut off your home’s main water valve instead.
Safety: Don’t force a stuck valve with a long wrench. Old valves can snap and turn a small drip into a flood.
Step 2: Tighten the compression nut
If water beads where the supply line meets the valve, hold the valve body steady with one wrench. Turn the nut clockwise about 1/4 turn with the other. Turn the water back on slowly and check with a dry paper towel.
Step 3: Replace a worn supply line
Replace the line if it’s bulging, kinked, rusty, or you have no idea how old it is. Unscrew both ends and take the old line to the hardware store so you match the length and fittings; many valves use a 3/8-inch compression outlet. Hand-tighten the new line, then add a 1/4 turn with a wrench.
Step 4: Check the valve stem
If water seeps around the valve handle, gently tighten the packing nut behind the handle about 1/8 turn. If it still weeps, or the valve is crusted with green or white deposits, it needs replacement. That’s often a plumber’s job, especially on soldered copper pipes.
Sink Drain Pipe Leaking? How to Repair the P-Trap and Drain Seals
Drain leaks only appear when water flows, and the pipes aren’t under pressure. That makes them a good first plumbing repair for a homeowner with basic tools.
Tools & materials
- Bucket and rag
- Slip-joint pliers (for metal nuts only)
- New slip-joint washers or a P-trap kit: 1-1/2 inch for kitchen sinks, 1-1/4 inch for most bathroom sinks
- Plumber’s putty
- A small cleaning brush or an used toothbrush
- Rubber gloves
Step 1: Hand-tighten the slip nuts
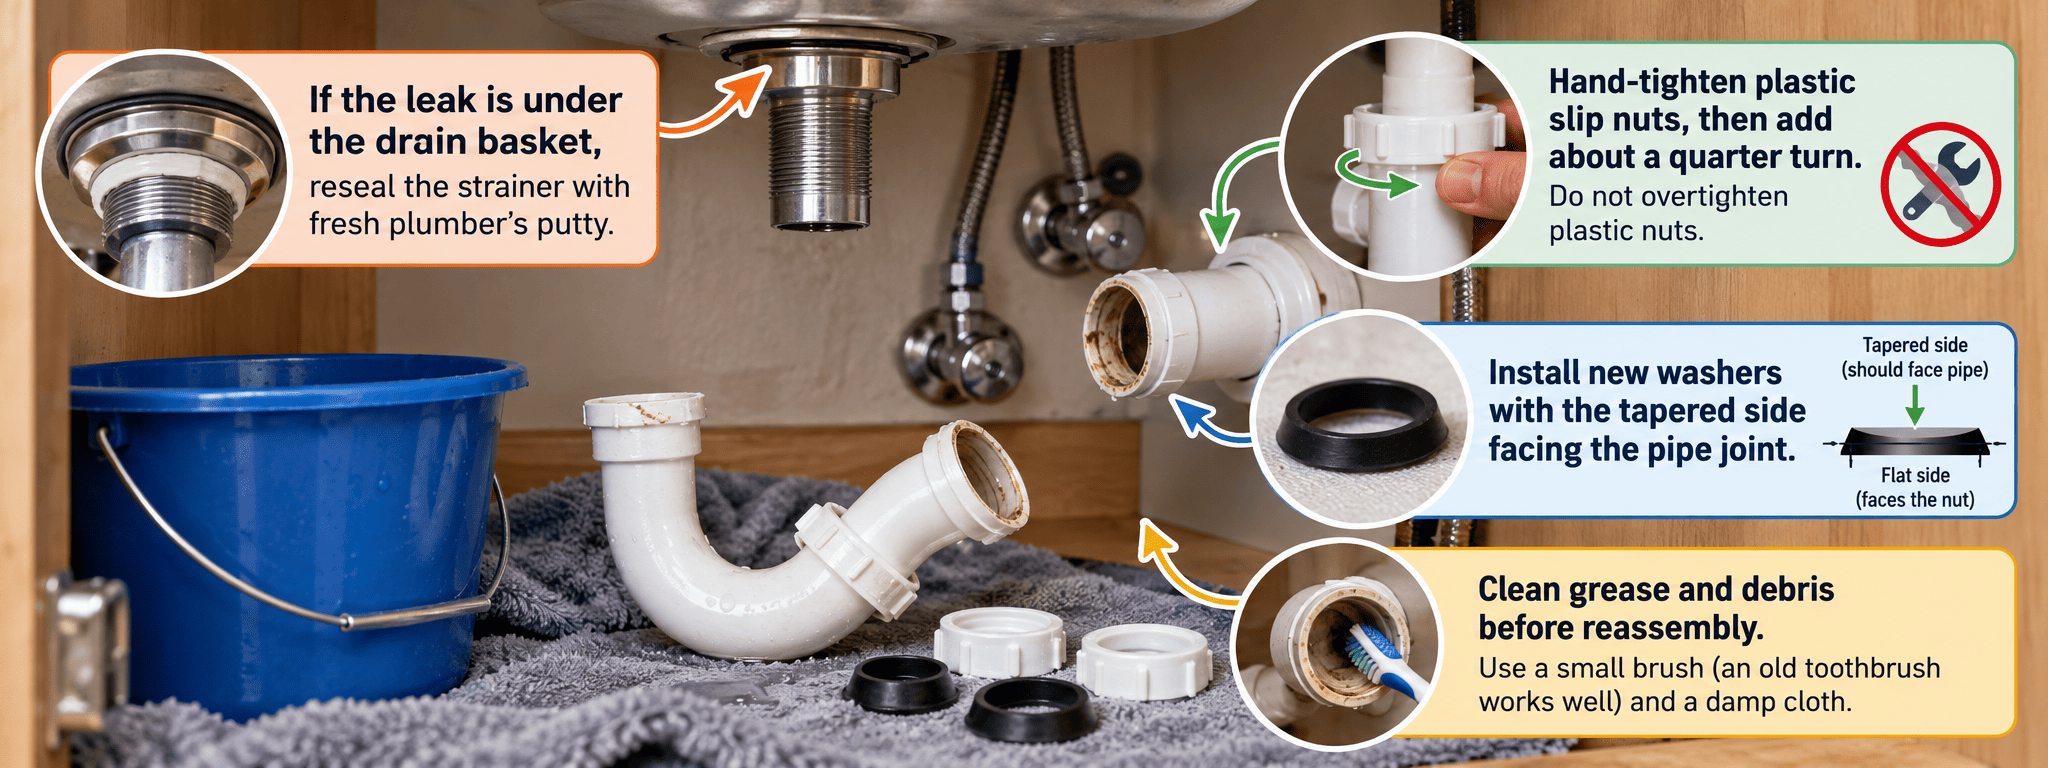
Many P-trap leaks come from a nut that has worked loose. Tighten plastic slip nuts by hand, then add about a quarter turn. Fill and drain the sink to test.
Step 2: Remove and clean the trap
Place the bucket under the trap, unscrew both slip nuts, and pull the trap free. Scrub out grease and debris with the toothbrush.
A partly clogged trap holds water longer and puts extra strain on the joints. If the drain is still slow after cleaning, our guide to common clogged drain problems covers the next steps.
Step 3: Replace the washers or the whole trap
Flattened or cracked washers won’t seal, no matter how hard you tighten. Install new ones with the tapered side facing the pipe joint, not the nut. Line the pipes up straight before tightening, because a trap forced into place at an angle will leak again.
Pro tip: Snap a photo of the trap before you take it apart. It saves guesswork when you put the pieces back together.
Step 4: Reseal the drain basket
If water appears right under the sink opening, the seal around the drain basket has failed. Loosen the large locknut under the sink, lift out the strainer, and scrape off the old putty. Press a fresh rope of plumber’s putty under the strainer’s rim, reinstall it, tighten the locknut, and wipe away the excess putty that squeezes out.
Safety: Plumber’s putty can stain natural stone and some composite sinks. Check your sink manufacturer’s instructions and use a silicone sealant made for plumbing if they recommend it.
What If the Leak Comes From the Faucet or Disposal?
If water only shows up while the faucet runs, and it appears near the base or the sprayer hose, the faucet itself is the likely culprit. Worn O-rings and cartridges are common. Our step-by-step guide on how to fix a leaking faucet walks you through the repair.
For kitchen sinks, check the dishwasher drain hose and the disposal connections too. A loose hose clamp is a quick fix. Water dripping from the bottom of the disposal usually means its internal seals have failed, and the unit needs replacement.
Safety: Turn off the disposal at the breaker, not just the wall switch, before you touch it.
When a Leaking Sink Is an Emergency
Most sink leaks can wait until the weekend. These signs can’t:
- Water is spraying or flowing, not dripping
- The shutoff valve won’t stop the flow
- Water appears on the wall behind the sink or the ceiling below
- The cabinet floor feels soft, spongy, or is sagging
- You smell mildew or see dark spots on the cabinet
- Water is near an outlet or the disposal’s electrical connection
Shut off the water at the valve or main, and turn off power at the breaker if water is near anything electrical. Then dry the area fast. The EPA recommends drying water-damaged areas within 24–48 hours to prevent mold growth.
DIY or Hire a Pro?
Good DIY project if…
- The leak comes from a slip nut, washer, or P-trap
- You’re replacing a supply line with an accessible shutoff valve
- The drain basket needs new putty
- The pipes are plastic and in good condition
Call a pro if…
- The leak is inside the wall or at the drain pipe where it enters the wall
- A shutoff valve is corroded, stuck, or soldered in place
- Your home has old galvanized steel or cast-iron drain lines
- The leak comes back after you’ve replaced the parts
- The cabinet floor or subfloor already shows water damage
Knowing how to fix leaking sink connections yourself saves a service call on the simple jobs. Here’s a simple rule: if you can see the leaking part and remove it by hand or with a wrench, try it yourself.
If fixing it means opening a wall or cutting pipe, hire a licensed plumber. Before you call, check local prices in the HireRush plumbing cost guide.
Common Mistakes to Avoid
- Overtightening plastic nuts. Plastic threads crack under a wrench. Hand-tight plus a quarter turn is enough.
- Using tape or pipe dope on slip joints. Slip joints seal with the washer. Tape can keep the washer from seating and cause new leaks.
- Reusing old washers. A flattened washer can keep a “fixed” trap dripping. New washers are inexpensive, so replace them whenever you open a joint.
- Testing with a trickle. A light stream won’t reveal a drain leak. Always fill the basin and drain it all at once.
- Covering a leak with caulk or silicone. Sealant on the outside of a joint only hides the problem while water keeps damaging the cabinet.
- Ignoring a damp cabinet floor. Even a slow drip can rot particleboard and grow mold within days.
How to Prevent Future Leaks Under the Sink
- Check under your sinks every few months with a flashlight.
- Keep grease, coffee grounds, and food scraps out of the drain.
- Don’t store heavy items that can bump or strain the pipes.
- Replace rubber or plastic supply lines with braided stainless steel lines.
- Place a leak detector or drip tray on the cabinet floor for early warning.
Final Thoughts
A leaking sink usually comes down to a loose slip nut, a worn washer, a failing supply line, or a dried-out drain seal. Drying the cabinet and testing in stages shows you exactly where the water comes from.
Most of these repairs take basic tools and under an hour. Leaks inside the wall, corroded valves, older pipe systems, or signs of water damage are a job for a licensed plumber.